Wave overhangs in action: a 90° cantilever printing without any support material. Original Reddit post.
As featured on The WAN Show with Linus Sebastian and Luke Lafreniere (Topic #6, 1:36:26 - 1:41:44).
What are wave overhangs?
In normal FDM printing, every layer needs something underneath it. Steep overhangs (anything past ~50°) sag or fall off the nozzle, so the slicer adds disposable support material that you snap off afterwards.
Wave overhangs replace those supports with a different toolpath. Instead of straight infill lines that need vertical backing, the slicer draws a sequence of curved rings that ripple outward from the supported edge into open air. Each new ring is laterally anchored to the previous one, like waves spreading on a pond, so it stays put even with nothing below it. The pattern propagates around corners, around holes, and across complex shapes until the layer is filled.
The result: support‑free overhangs up to 90°, less wasted filament, and no post‑processing snap‑off step.
Angled overhangs work too. The wave isn't restricted to fully horizontal overhangs. Any perimeter Orca classifies as overhang (geometrically: the extrusion extends past the layer below) becomes a candidate for wave, and there's no minimum angle setting. Practically, the wave only fills the unsupported portion of each layer, so a mild 50° wall only sees wave activity on the small lip that protrudes past the previous layer, while an 85° near‑horizontal cantilever sees wave across most of it.
This fork ports the technique into OrcaSlicer and exposes a large tunable parameter space, so people can experiment and find what works for their printer and material.
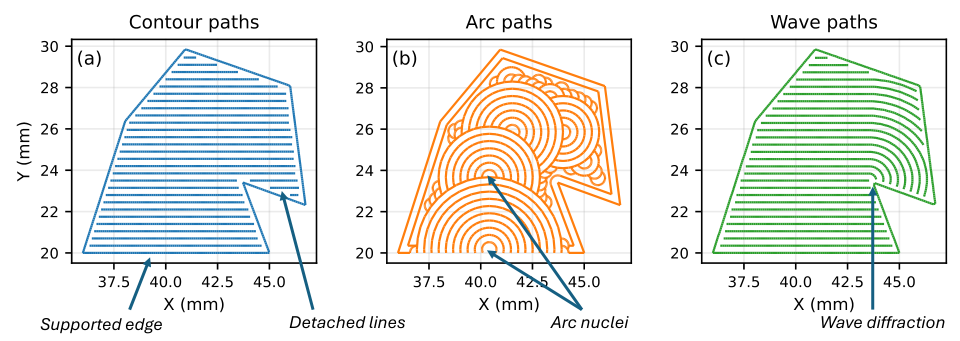
Comparison of standard, arc‑overhang, and wave‑overhang toolpaths. Image from the underlying wave‑overhang research (see Credits).
Main features
- Single wave‑overhang generator with expanding wavefronts, narrow‑region splitting, and Smart/ZigZag/Monotonic pattern selection.
- Dedicated Wave overhangs tab in Print Settings with grouped sections: General, Detection, Pattern, Corner reinforcement, Motion, Cooling, Floor layers, Debug.
- ~20 expert tunables for experimentation: line spacing, flow (mm³/mm), seam mode, spacing mode, pattern, perimeter overlap, minimum wave width, max iterations, authoritative floor layers, cooling overrides, and more.
- Community test‑print database at waveoverhangs.com where you can upload your results with settings and compare prints side‑by‑side.
- Wave‑aware support integration: supports only generate for overhang areas the wave couldn't cover.
- G‑code debug markers:
;WAVE_OVERHANG_CONFIG …header block and per‑region;WAVE_OVERHANG_START/ENDtags for easy post‑process verification. - First‑launch config importer: auto‑copies existing configs from OrcaSlicer, Bambu Studio, or PrusaSlicer so users don't start from zero.
- 100% opt‑in: master toggle off means identical behavior to upstream OrcaSlicer.
Download
Prebuilt binaries for tagged releases on the Releases page. Linux AppImage, Windows portable zip + installer, macOS universal DMG.
Linux: make the AppImage executable (chmod +x OrcaSlicerWaveOverhangs_Linux_*.AppImage) before running it. If it fails to start with a missing shared library, run it from a terminal to see which library is missing and install the matching distro package. Common ones: libwebpdecoder3, libwebp7, libheif1 (Debian/Ubuntu/Mint package names; other distros vary).
Using wave overhangs
- Launch the slicer, open a model with an overhang.
- Go to Print Settings → Wave overhangs tab.
- Toggle Use wave overhangs (Experimental) on.
- Slice and inspect the G‑code preview. Wave extrusions appear over detected overhang regions.
Simple mode shows just the master toggle. Switch to Advanced (top‑right mode selector) to tune individual parameters like line spacing, flow (mm³/mm), seam mode, etc.
For the full reference of every config option with tuning hints, see docs/WAVE_OVERHANG_SETTINGS.md.
Presets are intentionally not shipped yet. The tunable space is large and we want community test prints to surface what actually works before baking in named bundles. Please leave your results at waveoverhangs.com/upload so the dataset can grow.
How it works
The generator computes a seed at or near the supported edge of the overhang, then propagates wavefronts outward from it into the unsupported region until the fronts can't grow further inside the current layer.
The seed is a narrow band along the support‑overhang boundary. Each iteration offsets the accumulated covered region outward and emits a polyline along the new front; a pattern mode (Smart / Monotonic / ZigZag) decides how the fronts connect.

For the iteration flowchart and source pointers, see docs/ALGORITHMS.md.
Building from source
Dependencies are the same as upstream OrcaSlicer: CMake ≥ 3.13, gcc or clang, GTK3, plus the bundled deps under deps/. See the upstream OrcaSlicer build docs for the full platform‑by‑platform guide.
# 1. Build bundled deps
cd deps && mkdir -p build && cd build
cmake .. && make -j$(nproc)

# 2. Build the slicer
cd ../..
mkdir -p build && cd build
cmake .. -DSLIC3R_STATIC=1 -DSLIC3R_GTK=3 -DCMAKE_PREFIX_PATH=$(pwd)/../deps/build/destdir/usr/local
make -j$(nproc)
Current limitations
- Experimental. The tunable space is large (~20 knobs) and most parameter combinations have not been print‑tested yet. Expect rough edges. Please share what works and what doesn't at waveoverhangs.com.
- PLA recommended. Wave overhangs need each ring to cool and become rigid before the next pass anchors to it. PLA with max part‑cooling works well. PETG, ABS and PC are likely to fail (PETG cools too slowly and delaminates under heavy fan). If you've tested other materials, please upload the results (success or failure) to waveoverhangs.com/upload; failures are just as valuable for mapping out what's possible.
- Warping on larger spans. Laterally supported overhangs are prone to warping driven by thermal gradients, reheating of earlier layers, and nozzle pressure. Smaller overhangs print cleanly; larger spans may still need traditional supports. See docs/LIMITATIONS.md for the mechanisms and mitigations.
- Platform testing status: real‑print tested on Linux and Windows. macOS builds pass CI but haven't been validated against a physical printer yet.
Credits & research references
Wave overhang algorithm research
Wave‑Inspired Path‑Planning Strategy for Support‑Free Horizontal Overhangs in FDM. (2026) SSRN pre‑print. doi.org/10.2139/ssrn.6640458 Accompanying dataset: 10.17632/xhw8xkjyc2.1.
Arc‑overhang algorithm (the predecessor wave overhangs builds on)
Steven McCulloch: stmcculloch/arc‑overhang
PrusaSlicer wave‑overhang integration (the basis for this OrcaSlicer port)
Steven McCulloch: stmcculloch/PrusaSlicer‑WaveOverhangs
OrcaSlicer base
OrcaSlicer team: OrcaSlicer/OrcaSlicer
Contributing
- Open issues for bugs, feature requests, or print failures.
- PRs welcome. Base off
main. - When reporting test results, please share: model, parameter values used, printer, photos, G‑code snippet.
License: AGPL‑3.0 (inherited from OrcaSlicer).